Document Rich text

Rich text

Learn how to create and style long-form content using the Rich Text Element in Nilead — ideal for blogs, bios, and more.

Table of content

TL;DR / Overview

The Rich Text Element (RTE) in Nilead lets you write and format long-form content like blog posts, bios, and about pages — all in one convenient block. Skip dragging individual text and image elements. Just double-click and start typing.

Prerequisites

  • You have access to the Nilead Visual Editor

  • You are logged into your project as a content editor or higher

  • Optional: Style guide page set up for reusable rich text formatting

Walkthrough

1. Add a Rich Text Element

Add a Rich Text Element

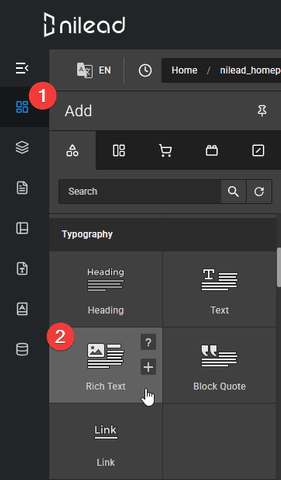
  1. Open the Add panel → go to Elements > Typography.

  2. Drag the Rich Text element onto the canvas where you want it to appear.

  3. To start editing, double-click the element or select it and press Enter.

💡 Pro tip: Use Rich Text Elements inside CMS Collection Templates for scalable blog or service pages.

2. Add and Format Text

Add and Format Text

  • Paragraphs: Just start typing. Press Enter for a new paragraph.

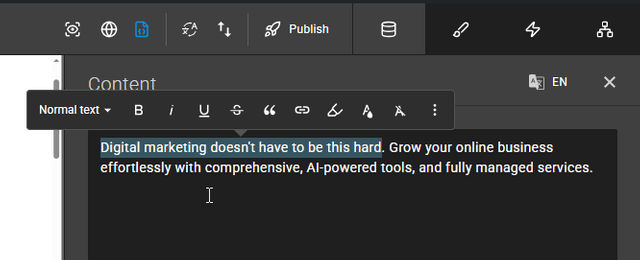
  • Headings: Select a line → choose H1 to H6 from the text toolbar.

  • Block quotes: Select text → click quote icon in toolbar.

  • Text formatting: Highlight text to apply bold, italic, subscript, superscript, or create links (to URLs, emails, phone numbers, etc.).

⌨ Keyboard shortcuts also work! Example: Cmd/Ctrl + B for bold.

3. Add Media, Lists, and Embed Content

  • Images: Paste or drag into the RTE. Add alt text and captions.

  • Lists:

    • Bullet list → type - + space

    • Numbered list → type 1. + space

  • Rich Media: Paste embed URLs (e.g., YouTube, SoundCloud, Giphy, Google Maps) — Nilead auto-detects and embeds them.

  • Custom Code: Use <embed> widget outside the RTE if you need granular HTML.

4. Paste External Content Safely

  • Rich text from Word, Google Docs, or websites can be pasted directly.

  • To avoid messy formatting (e.g., background colors or hidden spans), use:

    • Cmd + Option + Shift + V on Mac

    • Ctrl + Shift + V on Windows

  • For HTML content, use HTML Import — converts tags to widget elements.

5. Style Content Inside Rich Text

Basic styling:

  • Press Esc to deactivate editing mode

  • Select nested elements (like headings or quotes)

  • Apply styles via tag-based targeting or class assignment

Advanced styling:

  • Add a class to the RTE (e.g., .rich-text-blog)

  • Customize nested tags via global or combo classes

  • Use a Style Guide page to preview and test styles outside the CMS

⚠ Styling a tag (like h2) in a class affects all such tags inside that class — plan for reusability.


FAQs

1. Can I reuse rich text styles across multiple pages?
Yes. Use the same class on multiple RTEs and style it globally, or use a Style Guide page for a design system approach.

2. How do I continue a numbered list after inserting an image or video?
Simply type the next number followed by a period and space (e.g., 3. ) — the list will continue properly.

3. What’s the difference between using separate text elements and a Rich Text Element?
RTE allows faster content creation, better CMS integration, and centralized styling — ideal for blog posts and long text areas.

4. Can I embed forms or buttons in a Rich Text Element?
Not directly. For interactive elements like forms, buttons, or custom widgets, place them outside the RTE using the standard drag-and-drop elements.

5. How can I remove weird formatting after pasting text from Word?
Paste into a plain text editor (like Notepad) first, then copy/paste into Nilead — or use the shortcut to paste without formatting.

Discord chat

We're available Monday–Friday, security and critical bug fixes are available 24/7.

Facebook page

Get the latest news and updates regarding Nilead platform and services.