Document Image
Learn how to add, style, and optimize images in Nilead using image elements and the Media Manager.

Table of content

TL;DR / Overview

Image elements in Nilead are standalone components that allow you to visually enhance your site with photos, graphics, and illustrations. Unlike background images, image elements can be individually styled and configured. This tutorial walks you through adding images, editing them, and ensuring they're accessible and optimized.

Prerequisites

  • You must be logged into your Nilead account.

  • You need access to the Visual Website Builder.

  • Your image files should be under 10MB in size.

  • Recommended: Optimized images for web (e.g., resized, compressed).

Walkthrough

1. Adding Images to Your Canvas

  1. Open the Media Manager

    • Click the image icon in the top-right toolbar, next to your user menu.

  2. Upload an Image

    • Go to the “Upload” tab, then click the “Image” sub-tab.

    • Drag and drop files or click Browse to select images from your device.

    • Click Upload (bottom right corner).

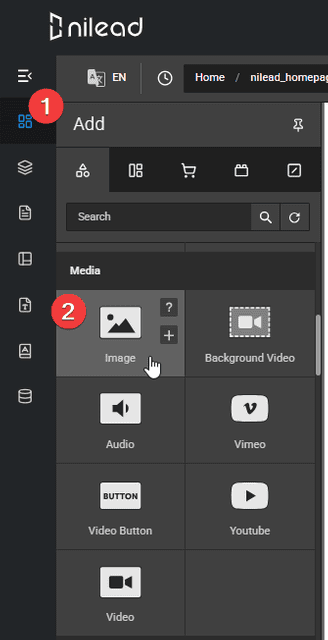
  3. Insert Image Element
    Insert Image Element

    • Click the Image element from the sidebar onto your canvas.

    • With the image element selected, use the configuration panel to choose your uploaded image.

💡 Tip: Nilead automatically creates responsive image variants, but for best results, upload pre-optimized images.

nilead - media manager

2. Editing Image Settings

Once the image element is selected, open its configuration panel. You can:

  • Rename the image and add a brief summary

  • Tag the image for better searchability

  • Set a focal point (important for responsive cropping)

  • Use basic editing tools: rotate, crop, flip, zoom

Nilead - media manager

3. Adding Alt Text

Alt text improves accessibility and SEO. To add it:

  1. Select the image element.

  2. Open the Image Settings.

  3. Locate the Alt Text field and enter a descriptive label.

Example: “Barista holding a cup of cappuccino at a wooden counter”

nilead platform - image settings

4. Using Dynamic Alt Text

To automate alt text with CMS or CRM data:

  1. Select the image element.

  2. In Image Settings, check the “Mapping” box.

  3. Choose the appropriate provider and data field.

This is useful for templated pages or product listings.

nilead platform - image dynamic alt text

5. Troubleshooting Image Uploads

If your image fails to upload:

  • Ensure it’s under 10MB and in a supported format (.jpg, .png, .webp).

  • Check your internet connection.

  • Try Incognito mode or disabling extensions that may block file input.

  • Rename the file if it contains special characters or spaces.


FAQs

1. What’s the difference between an image element and a background image?
Image elements stand alone on the canvas and can be resized, styled, and made clickable. Background images are applied to containers and are less flexible.

2. Does Nilead optimize images automatically?
Yes. Upon upload, Nilead creates responsive image versions. However, it’s still best practice to upload compressed images.

3. Can I reuse uploaded images across pages?
Absolutely. All uploaded images live in the Media Manager and can be used site-wide.

4. Is dynamic alt text required?
Not required, but recommended for sites with dynamic content like blogs, product listings, or CMS-driven pages.

5. What formats are supported?
Supported formats include .jpg, .jpeg, .png, .gif, .webp, and .svg (for vector graphics).

Discord chat

We're available Monday–Friday, security and critical bug fixes are available 24/7.

Facebook page

Get the latest news and updates regarding Nilead platform and services.